Canon Speedlite 430EX Comparison Test
First of all let me mention that I am no test or photography expert and I wish I had the knowledge, background and TIME to write a review similar to a dpreview.com level of detail. But I don't!
I bought the flash unit and was curious what the benefits were. So to test the settings I took some sample pictures and have included the pictures and my notes here for the benefit of all.
If you do not agree with my amateur observations then that is fine, you can make your own mind up as all of the full size pictures are on Flickr. Just click on the photos and click the "All sizes" button to get to the large versions. If you an amateur like me and are thinking of buying an external flash unit then hopefully this will help.
Also, before you do anything with your Canon flash you absolutely need to read NK Guy's Flash Photography with Canon EOS Cameras first!
In this post I have two tests:
- Comparison of the camera's built in flash with the Speedlite
- Comparison of a few basic flash options to improve a scene
- Canon 400D/Digital Rebel XTi
- Canon EF35mm f/2
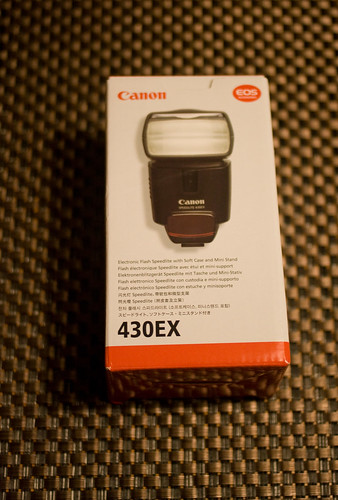
- Canon Speedlite 430EX
- Adobe Photoshop Lightroom
- Douglas Photographic Photographer's Grey Card
This test was performed indoors at night under a standard 100w light bulb. I chose the items in the scene to give reflections, darks, lights and a bit of colour. There is also a grey card used to help with the white balance corrections.
Shot #1.1
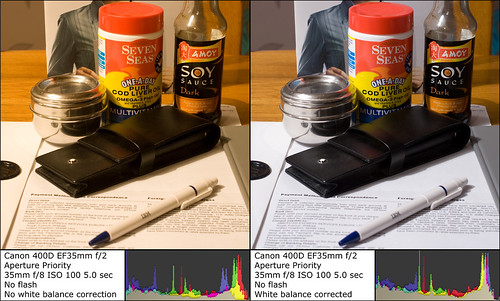
This was my control shot with no flash. True to the various reviews of the 400D the auto white balance selection is way off. Manual correction is required but the end result is a fairly well lit scene. Perhaps a bit dark and the shadows are a bit harsh but I would be reasonably happy with that shot. We are here to test the flash though, so lets press on.
Shot #1.2
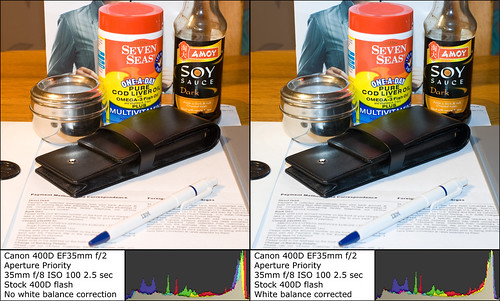
This is the built in pop up flash on the 400D. As with most flash photography at short range, it is very harsh. The shadows from the overhead light are softened out but the glare and reflection from the shiny objects is too much. The white of the pen and paper also loses a bit of detail. Interestingly the only blown highlights are in the reflections of the flash (which you would expect). The flash has been reflected off the shiny container onto the Mont Blanc pen case leaving a nasty light mark. At least the white balance was more accurate. Note that the camera automatically adjusted the shutter speed to adapt for the flash being switched on.
Shot #1.3
This was taken with the Speedlite 430EX pointing directly forward with all of the default settings. I was initially quite surprised by this shot as it is virtually no different to the built in flash. The shadows are slightly differently placed due to the height of the Speedlite but the glare is still there. So much for the "perfect exposure every time" claim from Canon!
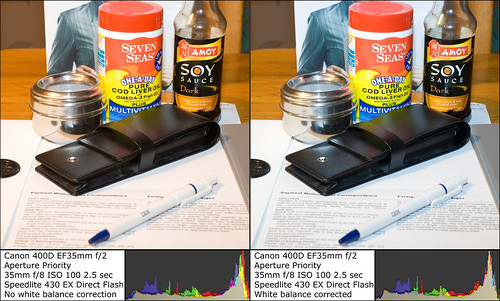
To be honest I should not have been surprised as a flash is a flash and directly head on is the worst kind of flash. I think I had assumed that the 'evaluative through the lens' (E-TTL) light metering would recognise not to blast out such a strong light pulse as it is not required.
I note that my EF 35mm f/2 lens does not support E-TTL distance measurement which means the flash will use a default setting. When I get a chance I will run a test with my EF-S 17-85mm f/4-5.6 IS USM that *does* support distance measurement. If you have no idea what I am on about then you have not read NK Guy's flash guide yet!
However, the point of an external flash is that you gain control over what it does...
Shot #1.4
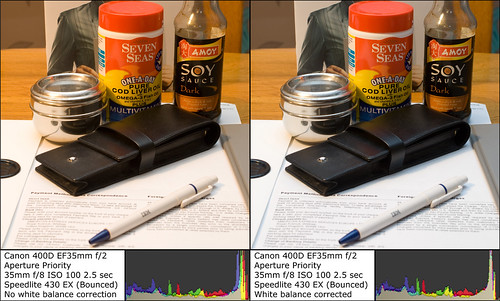
This shot used the flash as it is supposed (?) to be used as I directed the flash at my white ceiling and let the light bounce onto the scene. This has created a much more even light. The hard shadows of shot #1 have been softened slightly and there is no harsh glare from from the reflective objects. The flash is a lot less noticeable, in fact the glare from the light bulb on the neck of the bottle is what catches my eye.
Saying all that, for this scene I still prefer the side light from shot #1.1 as it provides more depth than shot #1.4. More practice required I think :-)
Test 2 - Comparison of a few basic flash options to improve a scene
This test was run in the same location as Test 1 but it was an overcast daylight coming through the window on the right of the scene casting long, dark shadows. There was also a window on the far side of the room on the left of the scene. The sun was coming from the right but you can still pick up the left hand window reflections in the Seven Seas container.
Shot #2.1

As with test 1 the camera's auto white balance is terrible, but shooting in RAW allows me to fix that in the Lightroom software. The light cast on the scene makes it look a bit dull. Handy I have a flash then!
Shot #2.2

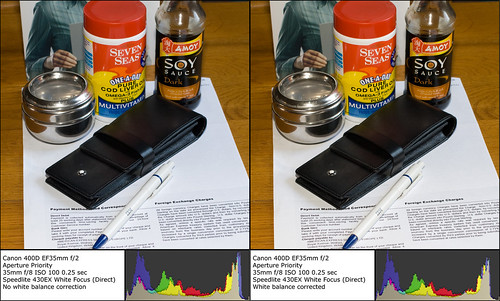
I have used the Speedlight with the flash pointing directly at the scene. In this test I wanted to test the difference between what focus point the camera registers because the Speedlite will use the active focus point at the time the photo is taken. This means if you use the camera like I do and keep the centre point as the main focus point, focus and then recompose before taking the shot then the flash will get confused.
In this shot, the focus point is central and focussed on the black Mont Blanc pen case. The result is that the background objects are better lit at the expense of the white paper in the foreground losing some definition. The shiny object has picked up the flash glare but because of the changed angle (looking down more) it is not as noticeable.
I am not sure why, but the camera did not change the shutter speed to adjust for the flash. I think the evaluative metering must have got hung up on the black. Lets see what happens if we change the focus point...
Shot #2.3
This shot used the lowest focus point that was covering the white paper in the foreground. Notice how the contrast of the paper is far better and the light looks more natural. A word of caution before you think the flash made a big difference: The camera was in aperture priority mode so me changing the focus point also changes the shutter speed as I was in evaluative metering mode. So a fairly inconclusive test that I need to redo when I get chance.
There is still a lot of glare so lets try and improve it a bit more...
Shot #2.4
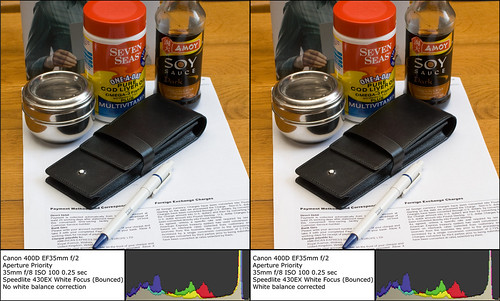
In this shot I aimed the flash away from the scene and bounced it off the back of my grey card (which is white). This has removed almost all of the glare from the scene and kept the lighting reasonably even. The shadows are softer and everything looks more evenly lit. Also in this final picture I only had to tweak the white balance the tiniest amount. I am not sure what happened to make the auto white balance work better but it is all good.
Conclusions
The external flash was not the immediate 'fix it all' solution I was hoping for but my first 50 shots on my 400D (my first SLR) were absolute rubbish as I had not learned how to use it. All of these quick tests were run with the Speedlite on the default "auto" settings so I was not making full use of the flash.
The flash unit gives a massive amount of tweaking potential that, once mastered, should prove to be a useful addition to my (ever increasing) camera kit. I never use the pop up flash just as I never use the camera's "auto" mode.
I am now considering a cheap softbox attachment for the Speedlite to see if I can get that utopian soft light for indoor portraits without having to invest in a remote flash or studio lights!
Am I glad I invested? Absolutely! I like the being in control of the flash in order to obtain better photographs. I now just need to learn how to use the thing!
I hope this was useful :-)